Seal These Air Leaks to Save Energy (and Money)
 With Fall officially arriving next weekend, now is a great time to think about making your home more energy efficient! Did you know that the average family spends a full third of their heating and cooling budget on air that leaks into or out of their house? In fact, sealing common draft sources is one of the most cost-effective ways to reduce your energy usage. Keep reading to learn about the 8 most common air leak culprits and how to plug them for good!
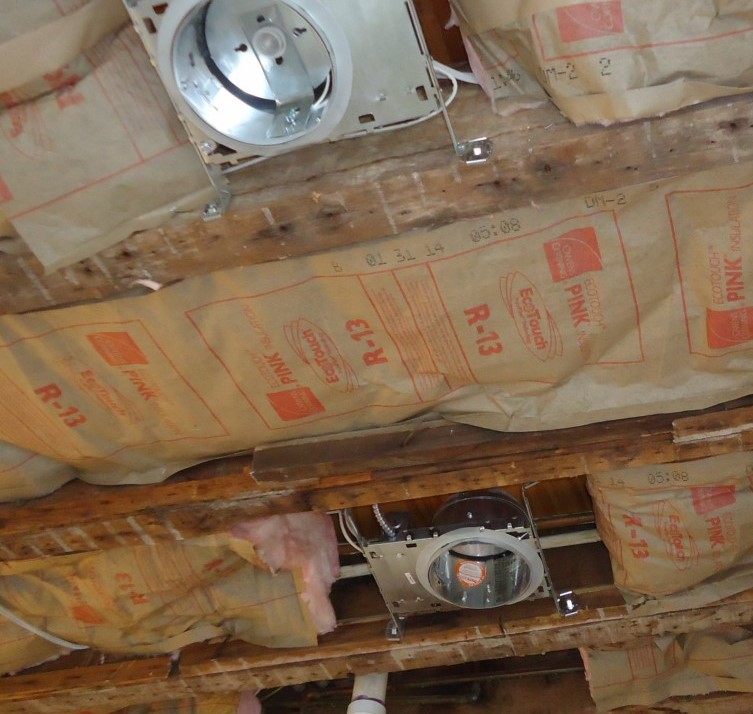
Recessed Lights
Recessed light fixtures are essentially vents that let air directly into your attic if they aren't insulated. To check whether a fixture has built-in insulation, look for a label next to the bulb that says "ICAT", for "insulation contact and air tight." If your recessed fixtures aren't insulated, seal them by inserting an airtight baffle ($10 to $40) into the light housing.
Open Stud Cavities
In the past, builders would often skip sealing walls that weren't visible from the interior living space, such as above a dropped ceiling or behind a ceiling that slopes into the top floor. To check if your home has these open stud cavities, go into your attic and look between the wall studs (you may need to move the insulation to do this). Plug these cavities with unfaced fiberglass insulation (.30 cents to $1.50/square foot) stuffed into plastic garbage bags. For larger gaps, use drywall or reflective foil insulation ($1.50 to $4.00/square foot). Remember to replace the insulation when you are finished!
Flues and Chimneys
Gaps between the chimney and studs are actually required by building codes to prevent fires, but they have the unfortunate effect of allowing air to easily leak into and out of your house. HouseLogic recommends using aluminum flashing (about $12) cut to fit the gap and then sealed into place with high-temperature silicone caulk ($5-$14). You can ensure that insulation does not come into contact with the hot flue pipe by placing a cylindrical barrier of flashing around it and leaving a 1-inch space in between the pipe and flashing. Cut and bend tabs inward along the top and bottom of the cylinder to create the spacing.
Attic Access Door
Seal the gap around your attic access door by placing caulking between the frame and rough opening and/or weatherstripping around the perimeter. Alternatively, buy a pre-insulated hatch cover kit for stairs ($50-$150) or doors ($350 and up).
Medium Gaps
Now that you've sealed the major sources of lost air in the attic, go through and fill in the various smaller holes from wires, pipes, etc. Low-expansion polyurethane foam (about $9/can) works very well for this application, but work fast before the can's applicator seals itself shut!
Small Gaps
For openings less than 1/4 wide, caulking is the way to go. Silicone costs the most ($10 a tube) and works better next to nonporous materials, such as metal flashing, but acrylic latex caulk ($3 a tube) is cheaper and will get the job done.
Basement
Use the same materials (foam for larger gaps and caulk for smaller gaps) to go through and seal your basement. Only openings above the outside soil level will let in air, so focus on those higher areas. Pay special attention to the gap where the house's framing sits on the foundation, as this is a common source of airflow.
Windows and Doors
As you might imagine, areas where the interior of the house is designed to open are very susceptible to air leaks! Caulking and weatherstripping can be used along both windows and doors with excellent results.
Get more information about sealing your home's air leaks at HouseLogic.com!
- Cheryl Bourland's blog
- Login or register to post comments
 Google+